Invoices
Create, send, and manage invoices for your repair services
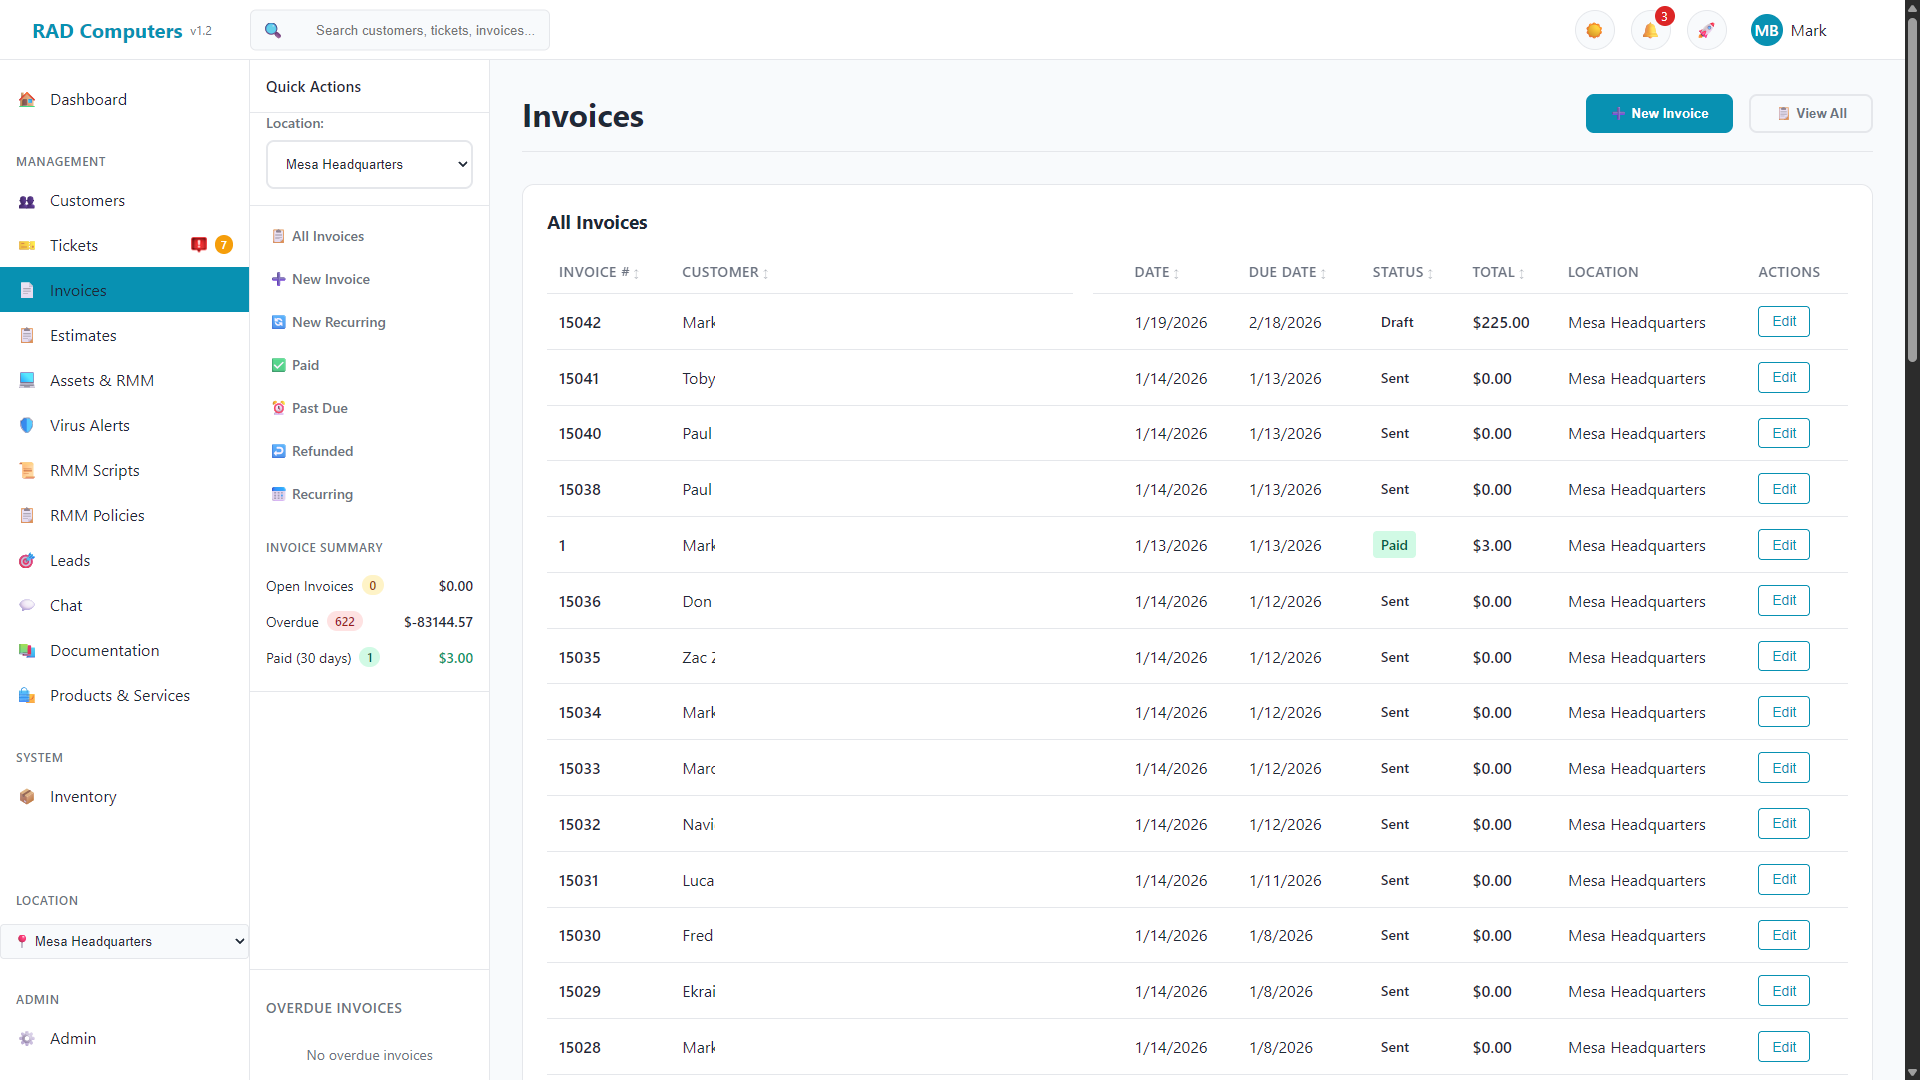
The Invoices list view showing all invoices with status filters
Overview
The Invoices module is your central hub for billing customers. Whether you are billing for a quick repair, a complex service project, or ongoing maintenance, RAD Repairs provides all the tools you need to create professional invoices, accept payments, and track your revenue.
Multiple Payment Methods
Accept credit cards via Stripe, ACH bank transfers, cash, check, store credit, or Zelle, Venmo, and Cash App with QR codes.
Email Invoices
Send invoices directly to customers via email with one click.
PDF Preview
Preview and print professional PDF invoices directly from your browser.
Recurring Invoices
Set up automatic recurring invoices with auto-send and auto-charge options.
Invoicing Workflow
The typical invoice workflow in RAD Repairs follows these stages:
Create a new invoice from scratch or from an existing ticket. When created from a ticket, customer information is pre-populated automatically.
Add products, services, and labor charges. Apply taxes, discounts, and adjust quantities as needed. The total updates automatically.
Review the invoice details, add any notes for the customer, then send it via email or print a copy for in-person transactions.
Process payments using the Take Payment button. Accept credit cards via Stripe, ACH bank transfers, cash, check, Zelle, Venmo, Cash App, or apply store credit. You can take the full balance or a partial payment. Customers can also pay online themselves through the customer portal.
When a payment is recorded, the customer is automatically emailed a receipt showing the amount paid, payment method, and remaining balance. The receipt respects the customer's "Receive Billing Emails" preference, and its wording can be customized in Admin Settings > Email Templates (Payment Receipt).
Once paid, the invoice status updates and contributes to your revenue reports. Track all invoices using status filters.
Invoice List View
The invoice list provides a comprehensive view of all your invoices with powerful filtering and search capabilities.
Status Filters
Quickly filter invoices by status using the shortcuts in the left sidebar:
- All Invoices - Shows all invoices regardless of status
- Past Due - Invoices past their due date
- Refunded - Invoices that have been refunded
- Recurring - Recurring invoice templates
The sidebar also shows an Invoice Summary with counts and totals for Open, Overdue, and Paid invoices - click any of them to filter the list.
Search & Sort
Use the search box in the top bar to find invoices by invoice number or customer name.
Click on any column header to sort the invoice list. Click again to reverse the sort order. This works for invoice number, customer name, date, due date, status, and total.
Needs Attention
When a customer replies to an invoice (for example, from the customer portal), the invoice appears in a highlighted Needs Attention section above the list with a bouncing attention icon, so you never miss a customer message.
Bulk Select & Delete
Every row in the invoice list has a checkbox. Use them to select multiple invoices (or the checkbox in the header to select all invoices on the page), then click Delete Selected in the red action bar that appears.
- This is designed for cleanup jobs - for example, deleting old past-due invoices imported from a previous platform so their payment reminders stop
- Tip: apply the Past Due filter first, then select all, to clear out overdue imports in one go
- Invoices with payments can only be deleted by owners and admins - technicians will get an error for those
- Recurring templates cannot be bulk-deleted; manage those from the Recurring filter instead
Bulk-deleted invoices cannot be recovered. Double-check your selection before confirming.
Creating an Invoice
There are two ways to create a new invoice:
Method 1: From Scratch
- Click + New Invoice in the top navigation or on the Invoices page
- Search for and select a customer (or create a new one)
- Add line items for products and services
- Set the due date and add any notes
- Save as draft or send immediately
Method 2: From a Ticket
- Open the ticket you want to invoice
- Click the Create Invoice button
- Customer information is automatically populated
- Add products and services used during the repair
- The invoice is linked to the ticket for reference
Creating invoices from tickets saves time and ensures consistency. It also maintains a clear audit trail linking the work performed to the billing.
Adding Line Items
Add products and services to your invoice using the searchable line item interface.
Adding Products and Services
In the line items section, click the + Add Item button to add a new line.
Start typing in the product/service field to search your catalog. Select an item from the dropdown to auto-fill the price.
Set the quantity and adjust the price if needed. Each line item has its own taxable checkbox.
Custom Items
You can also type a custom description directly instead of selecting from the catalog. Just enter the name, set the price and quantity manually.
If you find yourself adding the same custom item frequently, consider adding it to your Products or Services catalog for faster entry and better reporting.
Tax Calculation
RAD Repairs calculates tax based on your location settings.
Tax Settings
Tax rates are configured per location in Admin Settings. The system supports both state and city tax rates which are combined for the total tax rate.
Per-Item Tax Control
Each line item can be marked as taxable or non-taxable using the checkbox on the line item. Products and services from your catalog will automatically inherit their taxable setting.
Tax is calculated only on taxable line items. The invoice shows a breakdown of state and city tax when applicable.
Store Credit
Apply customer store credit when taking payment.
Using Store Credit
When processing a payment, you can apply a customer's available store credit:
- Click Take Payment on the invoice
- Select Store Credit as the payment method
- The customer's available credit balance is displayed
- Enter the amount to apply (up to the available balance or invoice total)
Store credit is managed in customer profiles. The credit balance is automatically deducted when applied to an invoice.
Invoice Statuses
Invoices can have the following statuses:
| Status | Color | Description |
|---|---|---|
| Draft | Gray | Invoice is being prepared |
| Sent | Blue | Invoice has been sent to the customer |
| Partial | Yellow/Amber | A partial payment has been received - a balance is still owed (set automatically) |
| Paid | Green | Invoice has been fully paid |
| Overdue | Red | Invoice is past its due date |
| Refunded | Purple | Invoice payment has been refunded |
| Cancelled | Gray | Invoice has been cancelled |
Draft, Sent, Paid, Overdue, and Cancelled can be set manually from the Status dropdown on the invoice. Partial and Refunded are set automatically when payments and refunds are recorded. Use the sidebar shortcuts and Invoice Summary to filter by status.
Sending Invoices via Email
Send invoices directly to your customers via email.
Sending an Invoice
The customer must have an email address on file. This is displayed in the customer info section when editing an invoice.
Click the Save & Send button to save the invoice and email it to the customer in one action.
If the customer does not have an email address, you will be prompted to add one before sending. You can also use the Preview button to generate a PDF for printing instead.
If you email an invoice that is already paid in full — for example a customer who can't find their receipt — the system sends the payment receipt (the same one sent automatically when a payment is recorded) instead of the unpaid invoice. On a paid invoice the button reads Send Receipt. Invoices with a remaining balance still send the invoice as usual.
Taking Payments
Click Take Payment on any invoice with a balance to open the payment window.
Taking a Payment
- Open an unpaid invoice and click Take Payment
- Confirm or adjust the Amount to Pay (see Partial Payments below)
- Select a payment method from the available options
- For credit cards, enter the card details in the Stripe card form
- Click Process Payment to complete the transaction
Partial Payments
You don't have to collect the full balance at once. The Amount to Pay field defaults to the full amount due, but you can enter any smaller amount to take a partial payment (a Full button restores the full balance).
- After a partial payment, the invoice status changes to Partial and shows the remaining balance
- Take as many payments as needed - the invoice flips to Paid automatically once the balance reaches zero
- Customers can also make partial payments themselves in the customer portal
Supported Payment Methods
| Method | Description |
|---|---|
| Credit Card | Enter card details in the secure Stripe form |
| Saved Method | Charge a payment method saved on the customer's profile |
| Bank (ACH) | Bank account payments verified via Plaid (lower fees, 4-5 day settlement) |
| Cash | Record cash payments received in person |
| Check | Record check payments with a check number field |
| Store Credit | Apply available credit from the customer's balance |
| Cash App | Shows a scannable QR code pre-filled with the amount (appears when Cash App is set up in the App Center) |
| Venmo | Shows a scannable QR code pre-filled with the amount (appears when Venmo is set up in the App Center) |
| Zelle | Shows your Zelle contact info and, if uploaded, your Zelle QR code (appears when Zelle is set up in the App Center) |
These person-to-person options appear in the payment window once configured in the App Center. The customer scans the QR code with their phone and sends the payment; you then record it against the invoice. All of these payments land in the customer's payment history just like card and cash payments.
Payment Links
Use the Payment Link button on an unpaid invoice to generate and copy a secure link you can text or email to the customer. The link takes them to an online payment page for that invoice.
Customer Portal Payments
Customers can log into the customer portal to view their invoices and pay online with Stripe. The portal supports full or partial payments - a customer can never pay more than what's owed.
Setting Up Stripe
Stripe must be connected in Admin Settings before you can accept card, saved-method, or ACH payments. Contact your administrator if Stripe is not configured.
RAD Repairs never stores credit card numbers. All card processing is handled securely by Stripe.
Recording Cash and Check Payments
For payments received in person, use the Take Payment feature to record them.
Recording a Cash Payment
- Open the invoice and click Take Payment
- Select Cash as the payment method
- Add any optional payment notes
- Click Process Payment
Recording a Check Payment
- Open the invoice and click Take Payment
- Select Check as the payment method
- Enter the check number in the Check Number field for your records
- Click Process Payment
Use the payment notes field to record check numbers, transaction references, or any other relevant details about the payment.
Refunding Payments
When a customer needs money back, use the Refund button on the invoice to record it. The button appears on any invoice that has payments that haven't been fully refunded yet.
Issuing a Refund
- Open the invoice and click Refund
- Enter the refund amount (defaults to the full refundable balance — you can refund less for a partial refund)
- Choose the refund method:
- Store Credit — adds the amount to the customer's store credit balance, usable on future invoices
- Original Card (Stripe) — sends the money back to the customer's card through Stripe automatically
- Cash / Check / Zelle / Venmo / Cash App / Other — records the refund; hand the money back to the customer separately
- Optionally add a reason or notes
- Click Process Refund and confirm
What Happens After a Refund
- The refund appears in the customer's payment history with a refund marker
- A fully refunded invoice changes to Refunded status
- A partially refunded invoice keeps its status and shows the refunded amount on the invoice
- Store credit refunds immediately increase the customer's credit balance
Card refunds are only available when the invoice was paid by card through Stripe. If the refund amount exceeds the original card payment, refund the card payment first and issue the remainder via another method. Refunds issued directly from the Stripe dashboard are also detected and recorded automatically.
Payment History
Every payment and refund is recorded in a running payment history ledger, so you always have a complete money trail for each customer.
- Where to find it - Open the customer's profile (Customers page) and scroll to the Payment History section. It lists every payment across all of that customer's invoices
- What's recorded - The date, amount, payment method (card, ACH, cash, check, store credit, Zelle, Venmo, Cash App), the invoice it applied to, and any notes such as check numbers
- Refunds - Refunds appear as their own entries marked as refunds, so the ledger tells the full story of money in and money out
- Customer view - Customers see their own payment history on the Payments page of the customer portal
Printing and PDF Preview
Preview and print invoices directly from your browser.
Preview Button
Click the Preview button to open a PDF version of the invoice in a new browser tab. From there you can:
- Print the invoice using your browser's print function
- Save the PDF to your computer
- Review the invoice layout before sending
Save & Print
The Save & Print button saves the invoice and sends it to the AutoPrinter service (if configured). This is useful for automatically printing invoices to a receipt printer or label printer.
Invoice PDF Contents
The generated PDF includes:
- Your company logo and contact information
- Invoice number and date
- Customer information
- Itemized list of products and services
- Subtotal, tax breakdown, and total
- Due date
- Invoice notes
If you have RAD AutoPrinter configured, the Save & Print button will send invoices directly to your printer. Configure this in Admin Settings.
Recurring Invoices
Set up automatic recurring invoices for subscription services, maintenance contracts, or managed services.
Creating a Recurring Invoice
Click New Recurring in the sidebar shortcuts to open the recurring invoice form.
Search for and select the customer who will receive the recurring invoices.
Set up the recurring invoice template:
- Template Name - A name to identify this recurring invoice
- Frequency - Weekly, Bi-Weekly, Monthly, Quarterly, Semi-Annually, or Annually
- First Invoice Date - When the first invoice will be generated
- Billing Terms - Due on Receipt, Net 15, or Net 30
Add the products and services that will appear on each invoice. Search your catalog or enter custom items.
Enable optional automation features:
- Auto-send email - Automatically email the invoice when generated
- Auto-charge card - Automatically charge the customer's saved payment method
- Apply available store credit - Automatically use the customer's store credit balance toward each generated invoice before anything is charged or billed
Managing Recurring Invoices
Use the Recurring filter in the sidebar to view all recurring invoice templates. Click on a template to:
- Edit template details and line items
- Change the frequency or next run date
- Enable or disable auto-send, auto-charge, and store credit
- Pause or reactivate the recurring invoice
Run Now
You can generate an invoice from a template immediately instead of waiting for the next scheduled date. Use the Run Now action on a recurring template - you'll be asked whether to also charge the customer's saved card right away.
To use auto-charge, the customer must have a saved payment method on their profile. You can add payment methods in the customer's profile page.
The system can automatically email customers when a recurring invoice payment is overdue. Enable the reminders and set the timing (days after the due date and repeat interval) in the billing settings on the Maintenance Plans page.
Frequently Asked Questions
Limits & Considerations
- Deleted invoices cannot be recovered (consider using Cancelled status instead)
- Invoices with payments can only be deleted by owners and admins
- Stripe payments require Stripe to be configured in Admin Settings
- Zelle, Venmo, and Cash App payment options only appear after they are set up in the App Center
- Card (Stripe) refunds require the original payment to have been made by card through Stripe
- Auto-charge on recurring invoices requires the customer to have a saved payment method
- Recurring invoices require at least one line item with a price greater than zero
- Email sending requires the customer to have an email address on file