Estimates
Create professional repair estimates, track status, and convert to invoices when approved
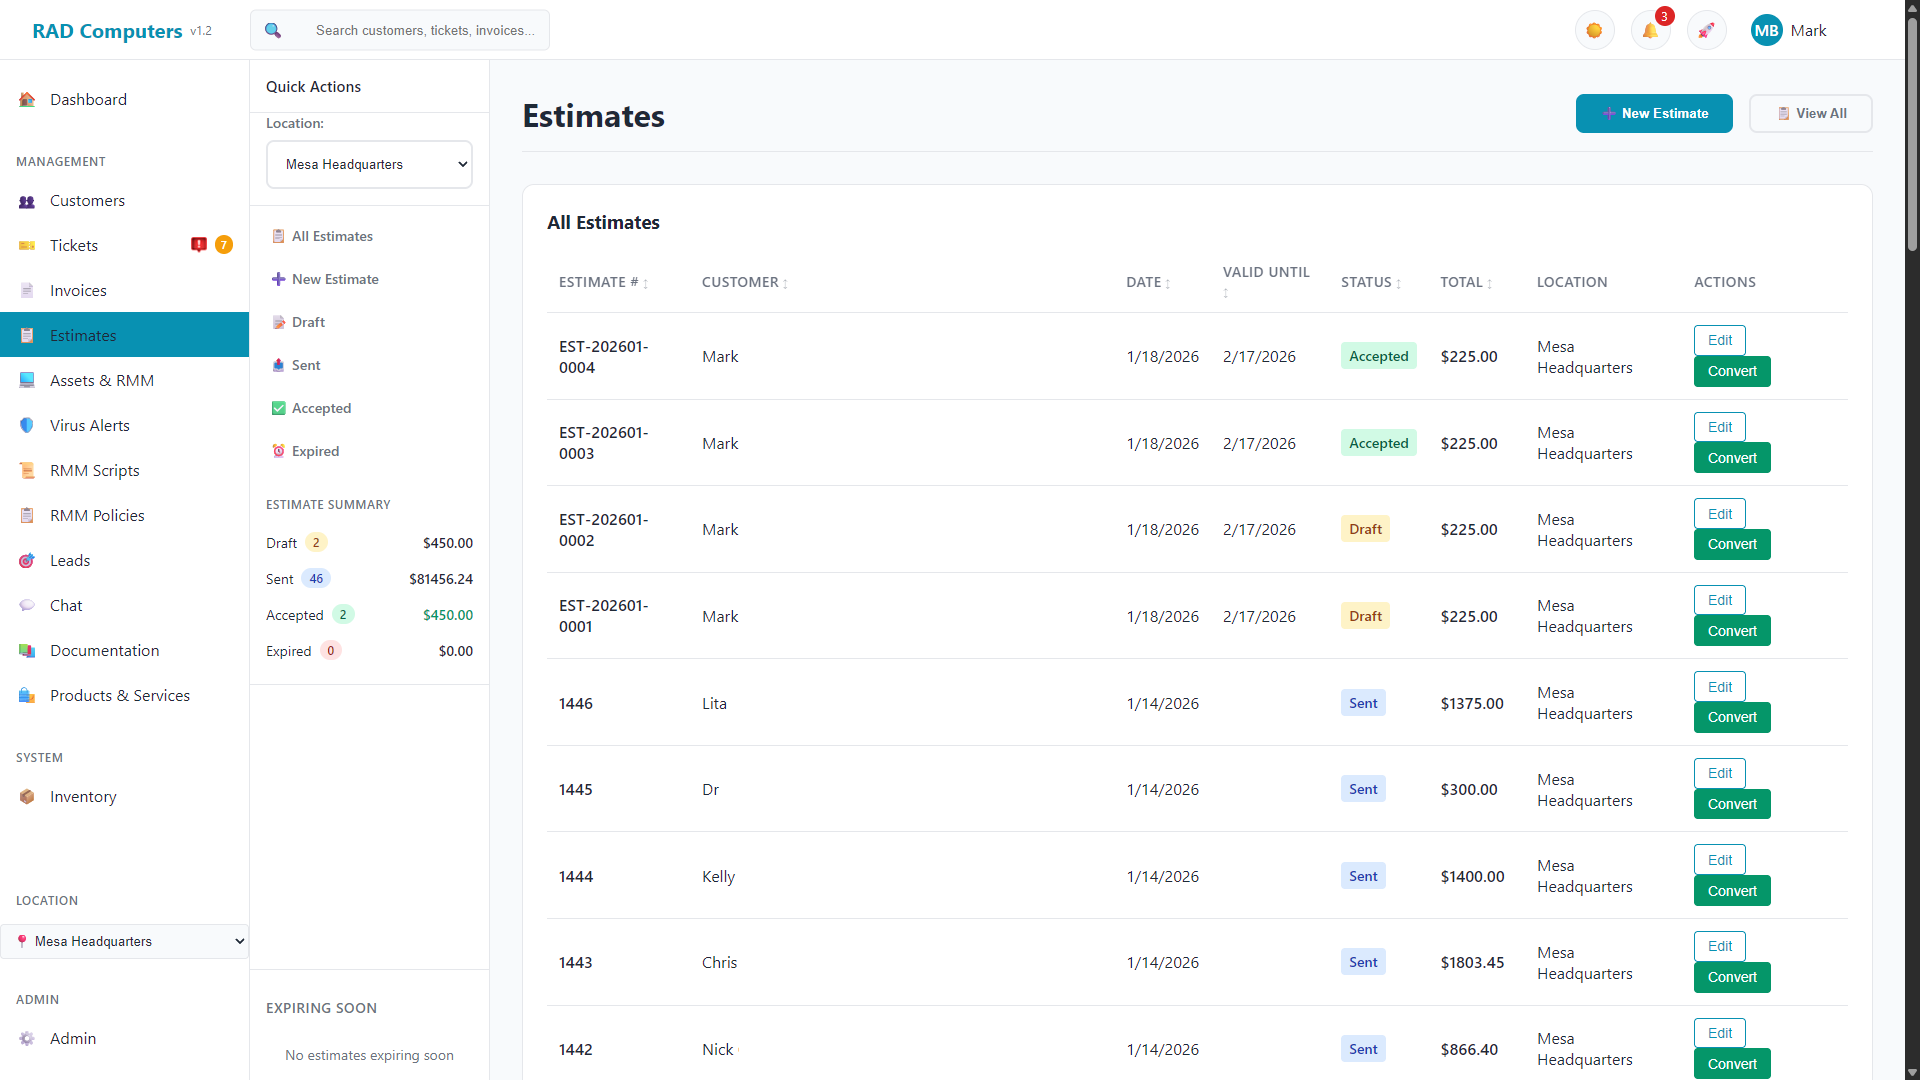
The Estimates list view showing all estimates with status indicators and quick actions
Overview
Estimates allow you to provide customers with detailed price quotes before committing to a repair. They help set clear expectations about costs, get customer approval, and streamline the billing process by converting directly to invoices once approved.
Professional Quotes
Create detailed estimates with itemized parts and labor costs from your product and service catalog.
Status Tracking
Track estimates through their lifecycle: Draft, Sent, Accepted, Declined, or Expired with visual status indicators.
One-Click Conversion
Convert approved estimates to invoices instantly, carrying over all line items and customer details.
Expiration Dates
Set validity periods on estimates to encourage timely decisions and protect against price changes.
When to Use Estimates vs. Invoices
Understanding when to use estimates versus invoices helps maintain professional relationships and clear financial records.
| Use Estimates When... | Use Invoices When... |
|---|---|
| The repair cost is uncertain or complex | The price is fixed and agreed upon |
| Customer approval is required before work begins | Work is already completed |
| You want to upsell additional services | Customer has pre-approved the work |
| Diagnosis reveals unexpected issues | Performing routine/standard services |
| High-value repairs requiring documentation | Repeat customers with standing agreements |
For diagnostic services, create an estimate first with your findings and recommended repairs. This gives customers time to decide and creates a paper trail of what was discussed.
Creating an Estimate
There are several ways to create a new estimate in RAD Repairs:
- Click the + New Estimate button on the Estimates page
- Navigate to Estimates and click New Estimate
- From a Customer's page, click New Estimate to pre-fill customer details
- From a Ticket, click Create Estimate to link the estimate to that ticket
Estimate Information
When creating an estimate, you will enter the following information:
| Field | Description | Required |
|---|---|---|
| Customer | Search for existing customer or use Quick Add to create a new one | Yes |
| Estimate Number | Auto-generated unique identifier for the estimate | Auto |
| Estimate Date | Date the estimate is created (defaults to today) | Yes |
| Valid Until | Expiration date for the estimate (defaults to 30 days from creation) | Yes |
| Status | Current status: Draft, Sent, Accepted, or Expired (Declined is set when a customer declines in the portal) | Yes |
| Notes | Terms, conditions, and additional notes that appear on the estimate | No |
| Linked Ticket | Automatically linked when creating an estimate from a ticket | No |
Adding Line Items
Line items are the products, services, and labor that make up your estimate. Click the + Add Line Item button to add items:
Start typing in the product/service field to search your catalog. Selecting an item automatically fills in the name, description, and price.
You can also type a custom description directly for one-off items not in your catalog.
Modify the quantity and unit price for any line item. The subtotal and total update automatically as you make changes, including applicable taxes based on your location settings.
Line Item Fields
- Product/Service - Search or enter the item description
- Quantity - Number of units
- Unit Price - Price per unit
- Total - Calculated line total (quantity x unit price)
Taxes are calculated automatically based on your location's tax settings configured in Admin Settings. The estimate shows a breakdown of subtotal, taxes, and total.
Estimate Statuses
Estimates move through different statuses as they progress through your workflow. Understanding these statuses helps you track and manage your pending quotes effectively.
| Status | Color | Description |
|---|---|---|
| Draft | Yellow/Amber | Estimate is being prepared and has not been sent to the customer yet |
| Sent | Blue | Estimate has been sent to the customer and is awaiting their response |
| Accepted | Green | Customer has approved the estimate - ready to convert to invoice |
| Declined | Red | Customer declined the estimate (set when they decline in the customer portal) |
| Expired | Red | Estimate has passed its "Valid Until" date without being accepted |
The sidebar shows estimates that are expiring within the next 7 days, helping you follow up with customers before estimates expire.
Sharing Estimates with Customers
Once your estimate is ready, you have several options to share it with the customer.
Click Save & Send to save the estimate and email it to the customer with the estimate PDF attached. The email can include a link the customer can click to approve the estimate online. The status is automatically updated to "Sent". The customer must have an email address on file.
Click Save & Print to save the estimate and send it to your configured printer. This is useful for providing a physical copy to customers in-store.
Click the Preview button to open the estimate as a PDF in a new browser tab. From there, you can print it locally or save it to share another way.
Customers can also view their estimates any time by logging into the customer portal, where they can approve or decline them online.
Customer Approval
Estimates can be approved by the customer online, or you can record an approval yourself.
Online Approval (Customer Portal)
Customers can open the estimate in the customer portal and click Approve or Decline. The estimate status updates automatically to "Accepted" or "Declined".
Phone/In-Person Approval
When a customer approves by phone or in person, change the status dropdown to "Accepted" and save the estimate to record the approval.
Communication Section
Each estimate has a Communication section where you can:
- Add notes about customer conversations
- Record approval details or special requests
- Mark notes as private (staff only) when needed
- View the history of all communications on the estimate
The Change History section (staff only) tracks all modifications made to the estimate, providing an audit trail of who changed what and when.
Converting Estimates to Invoices
Once an estimate is approved, converting it to an invoice takes just one click. This saves time and ensures accuracy by carrying over all the details.
Open the estimate you want to convert. Estimates in "Draft", "Sent", or "Accepted" status can be converted (declined and expired estimates cannot).
Click the Convert to Invoice button in the action bar. You will be asked to confirm before proceeding.
A new invoice is created with all line items, customer information, and totals copied from the estimate. The estimate status is updated to "Accepted".
You are automatically redirected to the new invoice where you can make any adjustments before finalizing.
The conversion process automatically handles all the data transfer, so you can go from approved estimate to ready-to-send invoice in seconds.
Estimate Expiration
Setting expiration dates on estimates helps protect your business from price changes and encourages customers to make timely decisions.
Default Expiration
New estimates default to a 30-day validity period. You can adjust the "Valid Until" date when creating or editing an estimate.
What Happens When Estimates Expire
- The estimate is shown with "Expired" status in the list view
- Expired estimates appear in the "Expired" filter category
- You can still open and review the estimate details
- You can edit and extend the validity date if needed
Managing Expiring Estimates
The "Expiring Soon" section in the sidebar shows estimates that will expire within the next 7 days. Use this to:
- Follow up with customers who haven't responded
- Extend the validity period if the customer needs more time
- Update pricing if needed before the estimate expires
Printing and PDF Generation
RAD Repairs generates professional PDF estimates that you can print or save for your records.
PDF Features
- Your Branding - Company logo, name, and contact info
- Professional Layout - Clean, itemized format
- Line Item Details - Products, services, quantities, and prices
- Tax Breakdown - Subtotal, taxes, and total
- Notes Section - Terms and conditions as entered on the estimate
Print Options
- Save & Print - Saves the estimate and sends it directly to your configured printer
- Preview - Opens the PDF in a new browser tab for viewing or local printing
If you have AutoPrinter configured, the "Save & Print" button will send the estimate directly to your designated printer. See the AutoPrinter documentation for setup instructions.
Frequently Asked Questions
Can I edit an estimate after marking it as sent?
Yes, you can edit estimates at any time. Simply open the estimate, make your changes, and save. Consider updating the "Valid Until" date if prices have changed.
What if a customer wants changes to an estimate?
Open the estimate, make the requested changes to line items or pricing, and save. You can add a note in the Communication section documenting the customer's requests.
Can I convert any estimate to an invoice?
You can convert estimates in Draft, Sent, or Accepted status. Declined and expired estimates cannot be converted (you can edit an expired estimate's "Valid Until" date to make it convertible again). The system confirms before converting and automatically updates the estimate status to "Accepted".
How do I filter estimates by status?
Use the quick filter links in the sidebar (All Estimates, Draft, Sent, Accepted, Expired) or click on the status counts in the Estimate Summary section to filter the list.
Can customers approve estimates online?
Yes. Customers can approve or decline estimates from the customer portal, and the estimate email can include an approval link. Approvals and declines update the estimate status automatically and record the date.
Can I create an estimate from a ticket?
Yes, from a ticket's detail page, click "Create Estimate" to generate a new estimate pre-linked to that ticket and customer. The customer information is automatically filled in.
How do I handle estimates for multiple locations?
Use the Location filter in the sidebar to view estimates for a specific location or select "All Locations" to see everything. Tax rates are calculated based on the selected location's settings.
What does the "Needs Attention" section show?
This section highlights estimates that have customer responses or comments that may require your review. Look for the attention indicator icon in the status column.
Related Documentation
Need Help?
Have questions about creating or managing estimates? Contact our support team for assistance.
Contact Support