Tickets
The heart of your repair shop operations. Track every repair from intake to completion with powerful workflow management.
Overview
Tickets are the core of RAD Repairs. Every repair job, service call, or customer request flows through the ticket system. From the moment a customer walks in with a broken device to the final pickup, tickets track every step of the journey.
What is a Ticket? A ticket represents a single repair job or service request. It contains all information about the customer's issue, the device being repaired, work performed, parts used, time spent, and the final resolution.
Ticket Workflow
The typical lifecycle of a repair ticket follows this flow:
Customer Intake
Customer brings in a device or contacts you about an issue. You create a new ticket, capturing the customer info, device details, and problem description.
Initial Assessment
A technician reviews the ticket and performs diagnosis. They may update the issue description, add notes, and create an estimate if needed.
Repair Work
The assigned technician performs the repair, logging time entries and adding technician notes throughout the process.
Customer Communication
Once the repair is complete, you update the ticket status and let the customer know. From the ticket you can send an Email, SMS, or both directly from the notes box - the message is saved on the ticket for your records.
Customer Pickup & Invoice
Customer picks up their device. You create an invoice from the ticket, collect payment, and change the ticket to a resolved status.
Ticket List
The ticket list gives you an at-a-glance view of all repairs in your shop. You can see ticket status, customer name, issue summary, assigned technician, and priority level.
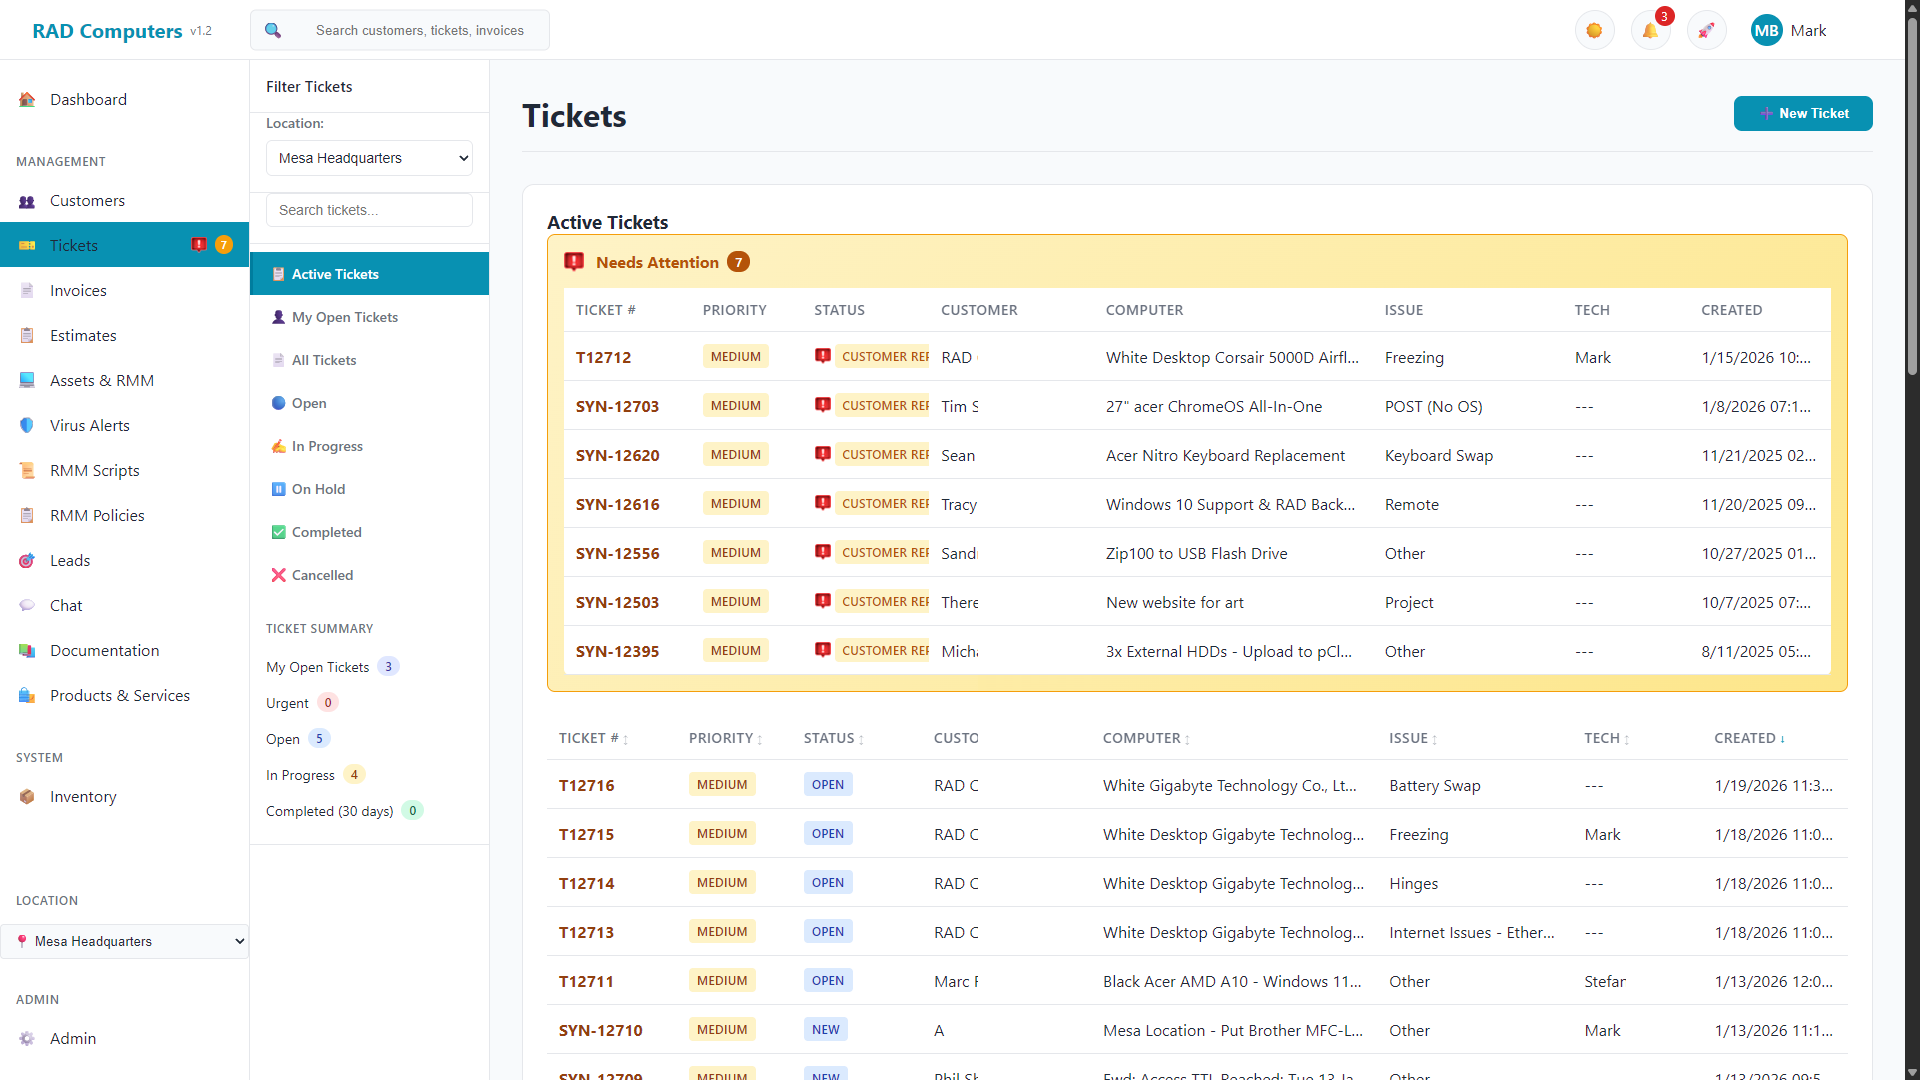

List Features
- Ticket Summary Stats - Quick overview showing counts for My Open Tickets, Urgent, Open, In Progress, and Completed (30 days)
- Needs Attention Section - Highlights tickets with "Customer Reply" status requiring follow-up
- Status Sidebar - Filter tickets using the secondary sidebar: Active Tickets, My Open Tickets, All Tickets, Open, In Progress, On Hold, Completed, Cancelled
- Location Filter - Dropdown to filter tickets by shop location
- Quick Status Badges - Color-coded status indicators for every status (Open, In Progress, Waiting for Parts, Waiting for Customer, Customer Reply, Resolved, plus any custom statuses), using the colors set in Admin Settings
- Quick Status Change - Click any status badge in the list to change that ticket's status on the spot, without opening the ticket. Perfect for closing out tickets that don't need any other updates
- Priority Badges - Visual indicators for Urgent, High, Medium, and Low priority tickets
- Sortable Columns - Click column headers to sort by Ticket #, Priority, Status, Customer, Computer, Issue, Tech, or Created date
- Search - Find tickets by customer name, ticket number, or issue description
- Pagination - Choose 25, 50, or 100 tickets per page with page navigation
Creating a New Ticket
Creating a new ticket captures all the information needed to track and complete a repair job. Here is a step-by-step guide:
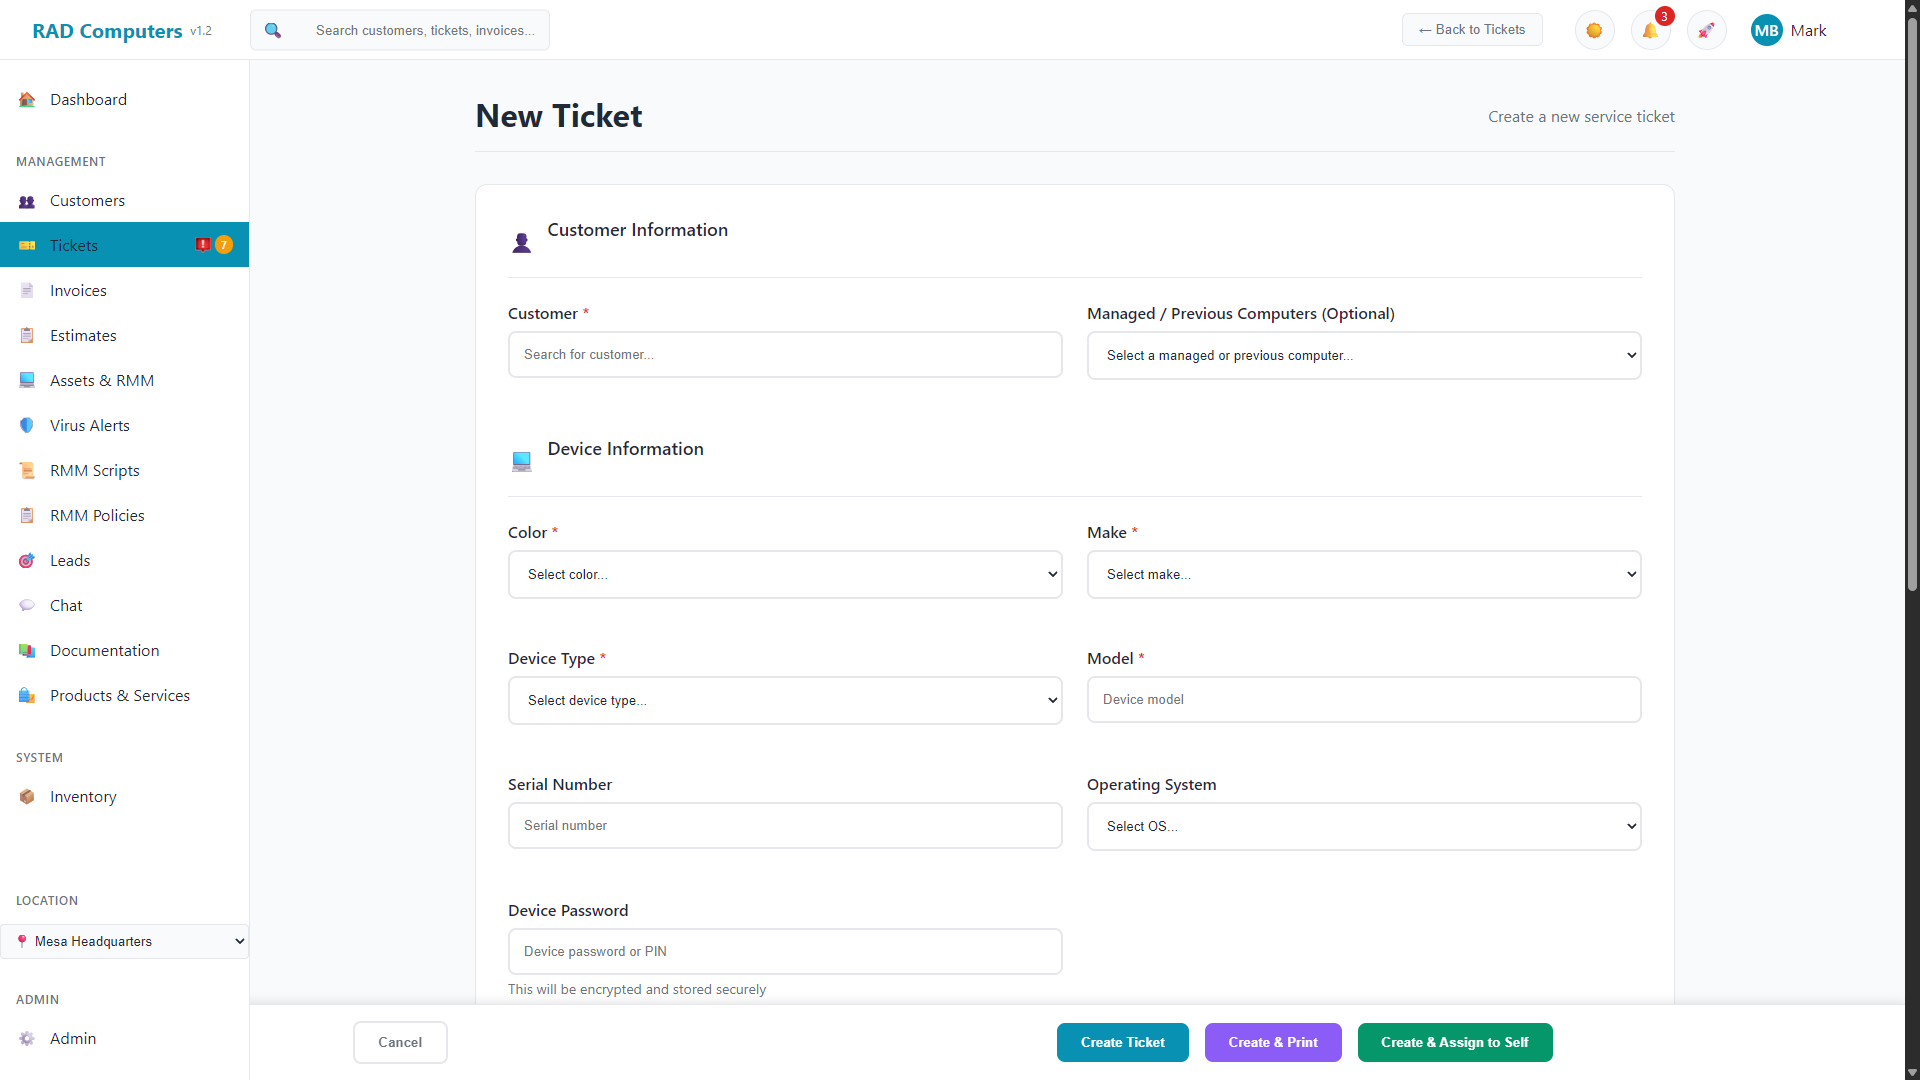
Select or Create Customer
Start typing the customer name to search existing customers. If this is a new customer, click "Add New Customer" to create their profile inline without leaving the ticket form. You can search by name, phone number, or email address.
Enter Device Check-In Information
Capture the device color, make, device type (laptop, desktop, phone, tablet, etc.), model, and serial number. You can also record the operating system and the device password/PIN so technicians can get into the machine. For laptops, the form asks whether the customer left the charger - the answer is stored on the ticket. If the customer already has devices on file (including RMM-managed computers), you can pick one from the "Managed / Previous Computers" list to link the ticket to that asset.
Select Issue Type
Choose the category that best describes the problem (for example Virus/Malware, Hardware Repair, Data Recovery, or Screen Replacement - your issue types are configurable). If a worksheet template is linked to the issue type, it is automatically attached to the ticket.
Describe the Issue
Enter a clear description of the customer's reported problem. Be specific - this helps technicians understand the issue and provides a record for future reference. Include any symptoms, error messages, or circumstances when the problem occurs.
Set Priority and Due Date
Choose the priority level (Low, Medium, High, Urgent) and optionally set a "Due By" date. Urgent tickets are counted on the ticket list summary and due-soon tickets are highlighted on the dashboard so they get immediate attention.
Assign Technician (Optional)
Assign the ticket to a specific technician, or leave it unassigned. Each technician can use the "My Open Tickets" view on the tickets page to see their own workload.
Save the Ticket
The ticket is created under the location currently selected in the sidebar, so make sure the right shop is selected if you operate multiple locations. If the customer has ticket email notifications enabled, they automatically receive a confirmation email when the ticket is created.
No device? For work that isn't about a specific computer — service calls, consultations, on-site jobs — tick “No device associated with ticket” next to Device Information. The device fields hide and are replaced by a simple Ticket Title box (with the description shown above priority). The ticket is created with no device and no asset attached.
Pro Tip: Use the quick customer search to speed up intake. Start typing any part of the customer's name, email, or phone number - matching results appear instantly. Press Enter to select the first match.
Document Device Condition: Always note any pre-existing damage (cracks, scratches, dents) in the intake notes. This protects your shop from false damage claims when the customer picks up their device.
Ticket Detail View
The ticket detail view is where all the work happens. Here you can see all ticket information, add notes, track time, update status, and manage the entire repair workflow.
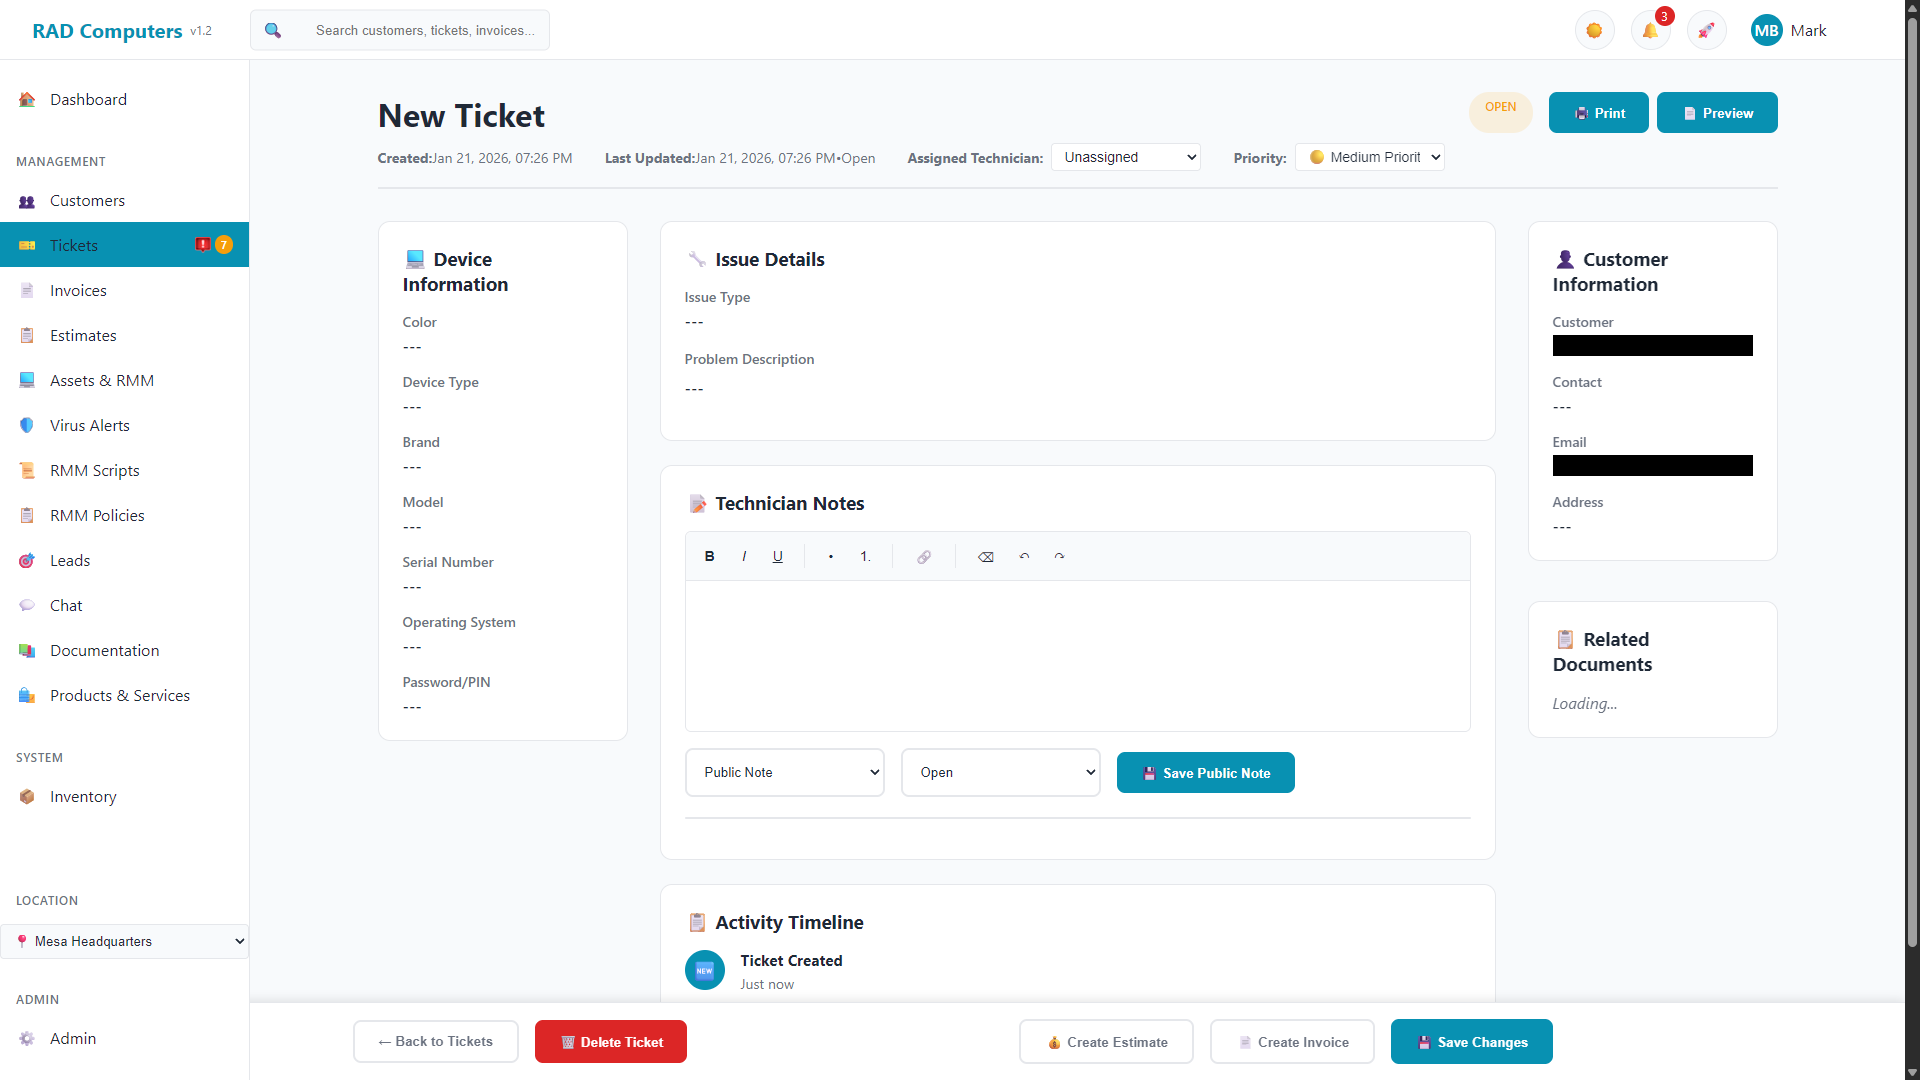
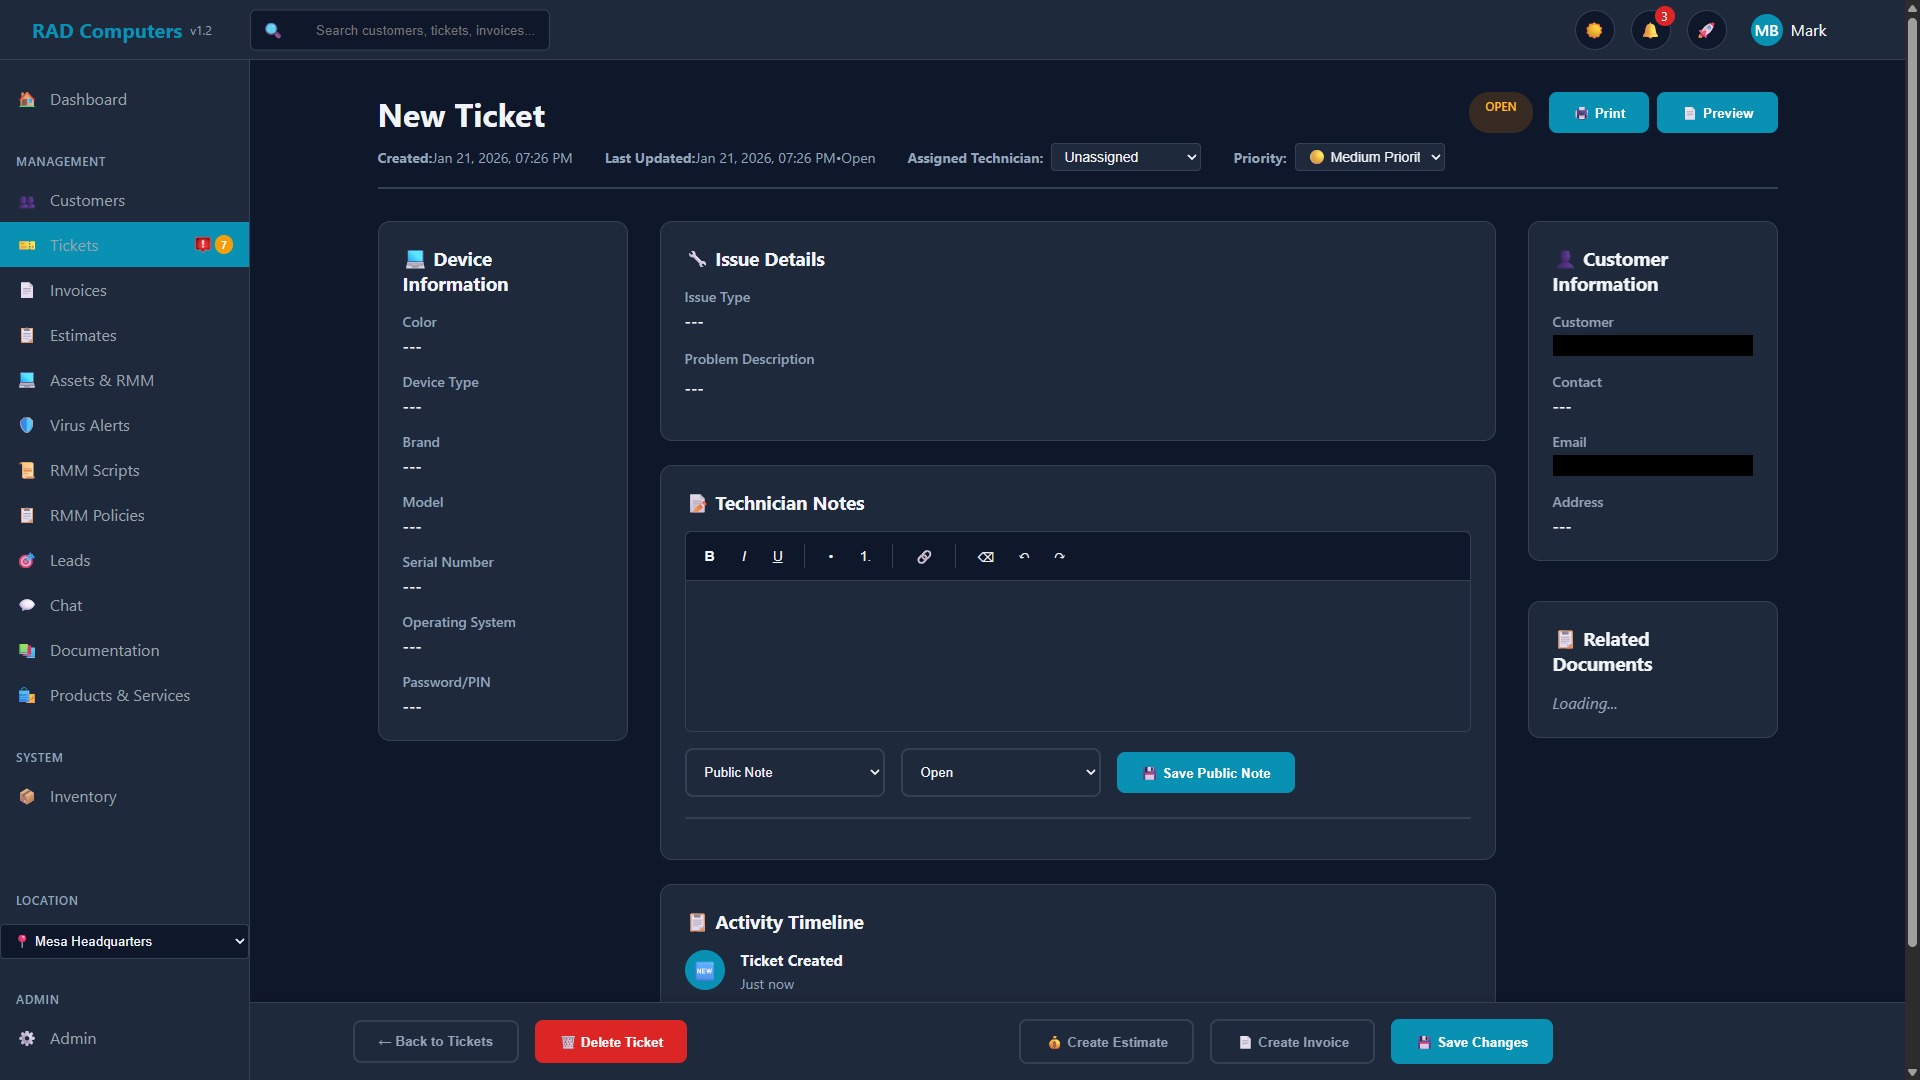
Detail View Sections
- Header - Ticket number, status badge, last-updated time, assigned technician dropdown, priority dropdown, and Print / Preview (PDF) buttons
- Device Information - Color, device type, brand, model, serial number, plus the operating system, device password/PIN, and (for laptops) whether the charger was left with the device, all captured at check-in
- Managed Endpoint - When the ticket is linked to an RMM-managed device, shows live details such as hostname and last user pulled from monitoring data
- Issue Details - The issue type and the customer's reported problem description
- Worksheets - Attached checklists for standardized repair procedures (shown when the ticket's issue type has a worksheet)
- Time Tracking - Built-in timer with Start/Stop controls, time entry list, and stats showing today's time, total time, and billable amount
- Technician Notes - Rich-text notes box with a note type selector: Public Note, Private Note, Email, SMS, or Email + SMS. The full note history appears below. Pasting from a website, Word, or Excel keeps the useful formatting (bold, lists, links, tables) and cleans out hidden markup automatically
- Need to Order - Paste product URLs for parts that need ordering and track each item as Pending, Ordered, or Received with an expected arrival date
- Activity Timeline - History of changes and communications on the ticket
- Customer Information - Contact details with one-click Call and SMS buttons, plus a Change button to reassign the ticket to a different customer (search by name, business, email, or phone; a note documenting the change is added to the ticket)
- Related Documents - Estimates and invoices linked to this ticket
- Attachments - Photos, documents, and files related to the repair (up to 25MB per file and 250MB per ticket). Files are stored securely and can only be downloaded by logged-in staff
- Action Bar - Buttons at the bottom of the page: Create Appointment (opens the scheduler dialog pre-filled with this customer and linked to the ticket), Merge Ticket, Convert to Project, Create Estimate, Create Invoice, Save Changes, and Delete Ticket (permission required)
Ticket Statuses
RAD Repairs tracks where each ticket is in the repair workflow using statuses. These are the default statuses included with every account:
| Status | Description | Typical Use |
|---|---|---|
| Open | Ticket just created, not yet reviewed | Initial intake - ticket awaiting technician assignment or diagnosis |
| In Progress | Actively being worked on | Technician is performing diagnosis or repair work on the device |
| Waiting for Parts | Repair paused pending parts arrival | Parts have been ordered and you are waiting for delivery before continuing |
| Waiting for Customer | Awaiting customer response or approval | Estimate sent for approval, awaiting customer decision, or need additional info from customer |
| Customer Reply | Customer has responded | Set automatically when a customer replies by email, replies in the customer portal, or submits a support request from the tray app on a managed device - these tickets appear in the "Needs Attention" section |
| Resolved | Ticket fully resolved | Repair finished, device picked up, ticket closed |
Customer Reply is automatic: "Customer Reply" is a system status. Whenever a customer emails a reply to a ticket, responds through the customer portal, or a support request comes in from the RMM tray app, the ticket's status changes to Customer Reply so your team knows a response is waiting.
Custom Statuses
You can create additional statuses in Admin Settings (Ticket Statuses) to match your specific workflow. For example, many shops add:
- On Hold - for paused tickets that need attention later (customer request, waiting for decision)
- Completed - for finished repairs awaiting pickup
- Cancelled - for repairs that were called off, keeping the record for history
- Quality Check - for a dedicated QA step before customer notification
- Warranty Repair - for manufacturer warranty work with different processing
The ticket list's status sidebar includes quick filters for On Hold, Completed, and Cancelled, so statuses with those names slot right into the built-in views.
Color Coding: Each status has a color assigned in Admin Settings. Use consistent colors (green for complete, red for urgent, yellow for waiting) to make the ticket list scannable at a glance.
Assigning Technicians
Proper technician assignment ensures work is distributed efficiently and customers know who is handling their repair.
Assignment Methods
- Assignment at Creation - Select a technician from the Assigned Technician dropdown when creating a ticket, or leave it unassigned
- Reassignment - Change the assigned technician anytime using the dropdown in the ticket header as workloads change or different skills are needed
Tracking Each Technician's Workload
- My Open Tickets - The tickets page sidebar includes a "My Open Tickets" view that shows only the tickets assigned to the logged-in user, with a matching count in the summary stats
- Open Tickets by Technician - The dashboard includes a chart showing how open tickets are distributed across your team, making workload imbalances easy to spot
- Tech Column - The ticket list shows the assigned technician for every ticket and can be sorted by that column
Shared Work: While only one technician is assigned at a time, any staff member can add notes and time entries to any ticket. Time entries record who did the work, so multi-tech repairs and shift handoffs are billed correctly.
Notes & Customer Communication
Effective documentation is crucial for quality repairs and customer satisfaction. The notes box on each ticket has a rich-text editor (bold, lists, links) and a type selector that controls where the note goes.
Note Types
| Note Type | Visibility | Purpose |
|---|---|---|
| Private Note | Staff only (internal) | Diagnostic findings, repair steps, internal reminders, parts needed - never shown to customers |
| Public Note | Customer visible | Notes the customer can see in the customer portal. Keep professional! |
| Email / SMS / Email + SMS | Sent to the customer | Sends the note to the customer as an email, a text message, or both, and saves a copy in the ticket's history |
| Incoming Replies | Automatic | Customer email replies, SMS replies, and portal comments are added to the ticket automatically and flip the status to "Customer Reply" |
| Activity Timeline | Staff only (automatic) | System-generated log of changes and communications on the ticket |
Best Practices for Notes
- Be Specific - Document exact symptoms, steps taken, tests performed, and findings
- Use Timestamps - Notes are automatically timestamped, but add time context when relevant ("after 2 hours of stress testing...")
- Keep Public Notes Professional - These are visible to the customer - avoid jargon and keep them clear and courteous
- Document Everything - If there is a dispute later, your notes are your evidence. When in doubt, write it down
- Handoff Notes - If another tech will continue the work, leave clear notes about status and next steps
Pro Tip: Use private notes to document pre-existing damage on devices at intake, and upload intake photos to the ticket's Attachments card. "Customer device had cracked corner on back case upon arrival - documented with intake photos" protects you from false damage claims.
Worksheets & Checklists
Worksheets are structured checklists that ensure consistent, thorough repairs. Each worksheet template is linked to one or more issue types and is attached to tickets automatically.
How Worksheets Work
- Create Templates - Build worksheet templates in Admin Settings with specific checklist items for each repair type, and choose which issue types each worksheet applies to
- Auto-Attach - When a ticket is created with a matching issue type, the worksheet is attached automatically and appears in the Worksheets card on the ticket
- Complete During Repair - Technicians check off items and fill in fields as they complete each step; responses save automatically
- Optional Customer Updates - You can enable a daily worksheet status email (off by default) that sends customers a progress summary for open tickets with worksheets
Example Worksheets
Laptop Diagnostic
Power test, battery health check, display inspection, keyboard/trackpad test, port verification, RAM test, storage health, software diagnostics
iPhone Screen Repair
Pre-repair photos, backup verification, screen removal, adhesive application, display test, touch calibration, Face ID/Touch ID test, water resistance seal
Data Recovery
Drive assessment, imaging attempt, file system analysis, recovery software scan, recovered files verification, data transfer to new drive, source drive handling
Virus Removal
Full malware scan, PUP removal, browser extension audit, startup items check, scheduled tasks review, hosts file check, security software install, customer education
Desktop Build
Component verification, motherboard install, CPU/cooler mount, RAM install, storage install, GPU install, cable management, POST test, OS install, driver updates
Network Setup
Router configuration, WiFi setup, firmware update, security settings, port forwarding, device connection, speed test, customer walkthrough
Required Items: Worksheet items can be marked as required when building the template. Required items are flagged with an asterisk on the ticket so technicians know which steps must not be skipped.
Worksheet Field Types
Worksheets can include various field types to capture different information:
- Checkboxes - Simple pass/fail or completed/not completed items
- Text Fields - For notes, serial numbers, or observations
- Dropdowns - Select from predefined options (Good/Fair/Poor, Yes/No/N/A)
- Number Fields - For measurements, counts, or readings (battery health %, temperatures)
Time Tracking
Accurate time tracking ensures you bill correctly for labor and helps identify efficiency opportunities. RAD Repairs offers a built-in timer and flexible time logging options.
Using the Timer
Each ticket has a dedicated Time Tracking section with a real-time timer. This is the easiest way to accurately track time spent on repairs.
Start the Timer
Open the ticket and click the green Start button in the Time Tracking section. The timer begins counting immediately, showing elapsed time in HH:MM:SS format.
Work on the Repair
Perform your repair work. The timer continues running even if you navigate away from the page or close your browser. Your running timer is tracked server-side.
Stop the Timer
When finished, click the yellow Stop button. The time entry is saved with the duration, your hourly rate, and marked as billable by default.
Timer Stats: The Time Tracking section displays three quick stats: Today (time logged on this ticket today), Total (all time logged on this ticket), and Billable (total billable amount based on hourly rates).
Runaway Protection: Timers are automatically capped at 8 hours to prevent accidental overnight running. If you forget to stop a timer, it will be automatically stopped and capped when you return to the ticket.
Manual Time Entry
You can also add time entries manually using the + Add Manual Entry button:
- Quick Entry - Enter minutes directly with a description of work performed
- Multiple Entries - Add as many time entries as needed for different work sessions or different technicians
- Billable Flag - Mark time as billable or non-billable (e.g., warranty work, goodwill repairs, training)
- Notes - Add notes describing the work performed during this time
Time Entry List
All time entries for a ticket are displayed in a scrollable list showing:
| Field | Description |
|---|---|
| Technician | Who performed the work (auto-filled from logged-in user) |
| Date/Time | When the work was performed |
| Duration | Hours and minutes spent (e.g., "1h 30m") |
| Billable Amount | Calculated from duration x hourly rate (shown in green) |
| Notes | Description of work performed |
| Billable Badge | Green "Billable" or gray "Non-billable" indicator |
Hourly Rates
Each technician can have an hourly rate configured in Admin Settings under User Management. When a timer is started, the technician's current hourly rate is captured with the time entry. This allows for:
- Different rates for different skill levels (junior tech vs. senior tech)
- Accurate labor billing based on who performed the work
- Rate snapshots - if rates change, historical entries keep their original rate
Adding Labor to Invoices
When creating an invoice from a ticket, you can easily import all tracked labor:
- Click Create Invoice from the ticket
- On the invoice page, click the Add Labor from Ticket button
- A modal shows the ticket's billable time entries
- Select which entries to include
- Check Combine all entries into single line item to bill one labor line, or uncheck it to keep each entry as its own line
- Confirm to add the labor line items to the invoice
Automatic Calculations: Labor line items are automatically calculated as hours x hourly rate. For example, 1.5 hours at $75/hr creates a $112.50 labor charge.
Time Reporting
Logged time is useful beyond billing:
- Each ticket shows its total tracked time and total billable amount at a glance
- Time entries record which technician did the work, supporting fair workload reviews
- The technician report in the Reports section helps you review team performance
One Timer at a Time: You can only have one timer running across all tickets. If you try to start a timer while another is running, you'll see a message indicating which ticket has the active timer.
Creating Invoices and Estimates from Tickets
When repair work is complete (or when you need approval before starting), create an invoice or estimate directly from the ticket. The document is automatically linked to the ticket and pre-filled with the customer's details.
Invoice Process
Click "Create Invoice"
Use the Create Invoice button in the action bar at the bottom of the ticket view. The invoice page opens with the customer's name, email, phone, and address pre-filled, and the invoice linked to the ticket.
Add Products and Services
Add line items from your product and service catalog for the parts used and work performed. Adjust quantities and pricing as needed.
Import Labor
Click Add Labor from Ticket to pull in the ticket's billable time entries as labor line items, calculated at each technician's hourly rate.
Collect Payment or Send
Take payment on the spot, or send the invoice to the customer. Customers can pay online through the customer portal, including partial payments.
Other Actions from the Ticket
- Create Estimate - Build an estimate linked to the ticket and send it for the customer's approval before starting work
- Convert to Project - Turn a ticket into a project when the job grows beyond a single repair (multiple tasks, phases, or devices)
- Merge Ticket - Combine a duplicate ticket into this one; its notes, time entries, worksheets, linked estimates and invoices, and email/SMS history all move over
Linked Documents: Estimates and invoices created from a ticket appear in the ticket's Related Documents card, so the full billing history for a repair is always one click away. A single ticket can have multiple linked invoices (e.g., a deposit invoice plus a final invoice).
Printing Tickets
Print a ticket at intake so the customer leaves with a copy, or print a work order for the bench. The ticket header has two print buttons:
Print Options
- Print - Sends the ticket to your AutoPrinter queue for automatic printing on the shop printer. AutoPrinter is set up in the App Center and configured (API keys and print settings) in Admin Settings
- Preview - Opens a PDF of the ticket in a new browser tab so you can review it or print it locally from your own computer
QR Code on Printed Tickets
Every printed ticket includes a QR code that links directly to that ticket in RAD Repairs. Scan it with a phone or tablet to jump straight to the ticket - no searching required.
- Instant worksheet access - A technician at the bench scans the QR code on the printed work order and lands on the ticket, with its worksheets, notes, and time tracking right there on their device
- No typing ticket numbers - The code encodes the ticket's direct link on your RAD Repairs site, so the right ticket opens every time
- Staff only - The link opens the staff ticket view, so the person scanning must be signed in to RAD Repairs on that device. Customers should use the Customer Portal instead
Tip: Keep the printed ticket with the device on the bench. Any technician who picks up the job can scan the QR code to open the ticket and continue the worksheet exactly where the last person left off.
Checking Repair Status: Customers do not need a printed copy to check on their repair - they can log into the Customer Portal with a magic link sent to their email to see ticket status anytime.
Filtering and Searching Tickets
With potentially hundreds or thousands of tickets, finding the right one quickly is essential. RAD Repairs provides powerful search and filter tools.
Search Capabilities
- Ticket Search - The search box on the tickets page matches the ticket number, subject, issue description, and customer name
- Partial Matching - Search "john" finds tickets for John Smith and Johnny Appleseed
- Global Search - The search bar in the top navigation finds customers, tickets, and invoices from any page
Filter Options
| Filter | Description |
|---|---|
| Status Sidebar | One-click views for Active Tickets, My Open Tickets, All Tickets, Open, In Progress, On Hold, Completed, and Cancelled |
| Location | Dropdown to show a single shop location or All Locations (for multi-location setups) |
| Urgent | Click the Urgent card in the summary stats to show only urgent-priority tickets |
| Sortable Columns | Click any column header (Ticket #, Priority, Status, Customer, Computer, Issue, Tech, Created) to sort; click again to reverse |
| Per-Customer View | Open a customer's record to see all of their tickets on the Tickets tab of the customer detail view |
Quick Filter Views
Use the status sidebar to quickly filter tickets by common views:
- "Active Tickets" - All tickets that are not completed, resolved, or cancelled
- "My Open Tickets" - Open tickets assigned to you
- "All Tickets" - Complete ticket history including completed and cancelled
- Status Filters - Open, In Progress, On Hold, Completed, Cancelled
Customer Portal
The Customer Portal is a separate, secure interface where your customers can view their repair status, invoices, estimates, and more - without needing access to your staff backend.
How Customers Access the Portal
Customers access the portal using passwordless authentication via magic links:
Navigate to the Portal
Customers can reach the portal by clicking a link in a notification email (most common), or by visiting your portal URL directly (e.g., yourshop.radrepairs.com/portal).
Enter Email Address
On the portal login page, customers enter the email address associated with their account. No password is required.
Check Email for Magic Link
The system sends a secure, time-limited magic link to their email. Clicking this link logs them in automatically.
View Their Information
Once logged in, customers can view their tickets, invoices, estimates, and registered assets.
Why Magic Links? Magic link authentication eliminates password management for customers. They don't need to remember yet another password, and you don't need to handle password reset requests. It's secure (links expire quickly) and convenient.
What Customers Can See
The Customer Portal provides customers with visibility into:
- Ticket Status - Current status of their repairs and their past tickets
- Public Notes - Notes you saved as "Public Note" (private notes remain hidden)
- Ticket Replies - Customers can reply to a ticket from the portal; the reply is added to the ticket and its status changes to "Customer Reply" so your team follows up
- Invoices - View and pay outstanding invoices online, including partial payments
- Estimates - Review and approve estimates for proposed work
- Assets - View their registered devices and equipment
What Customers Cannot See
The portal keeps your internal operations private:
- Private/technician notes (only Public Notes are shown)
- Cost/margin information
- Other customers' information
- Internal communications
- Time tracking details and labor costs
Reduce Phone Calls: The Customer Portal dramatically reduces "is it ready yet?" calls. Customers can check their repair status anytime, 24/7, from their phone or computer.
Customer Email Notifications
Customers with ticket notifications enabled receive emails at key points:
- When a new ticket is created for them (confirmation with the ticket details)
- When you send them an Email or Email + SMS note from the ticket
- When an estimate or invoice is sent to them
- Optionally, a daily progress summary for tickets with worksheets (if you enable worksheet status emails)
- Optionally, a follow-up email a configurable number of days after their ticket is resolved - a customizable "thank you / how did we do?" message with a portal link where they can view their history, pay invoices, and sign up for a maintenance plan. Enable it in Admin Settings → Ticket Management
Notification emails can include a link to the portal where customers can view details, and customers can simply reply to ticket emails - replies land on the ticket automatically.
Frequently Asked Questions
Can I reopen a completed ticket?
Yes. Open the ticket and change the status back to any active status (such as "In Progress"). This is useful if a customer returns with the same issue (warranty work) or if you need to add additional notes or time entries after the fact.
How do I delete a ticket?
Users with the delete-tickets permission (owners and admins by default) can use the Delete Ticket button at the bottom of the ticket view. For most situations it is better to change the ticket to a "Cancelled" status instead - this removes it from active views while preserving the record for your history.
Can customers see their ticket status online?
Yes! Customers access the Customer Portal using magic link authentication (no password needed). They enter their email, receive a secure login link, and can view their tickets, invoices, estimates, and assets.
How do location assignments work for tickets?
A ticket belongs to the location that was selected in the sidebar when it was created. Use the Location dropdown on the tickets page to view a single shop or All Locations.
Can I merge duplicate tickets?
Yes. Click Merge Ticket at the bottom of the ticket detail view, search for the duplicate ticket, and confirm. The other ticket's notes, time entries, worksheets, linked estimates and invoices, and email/SMS history are combined into the ticket you are viewing.
What happens to the ticket when I create an invoice?
The ticket remains open and linked to the invoice (shown in the Related Documents card). You can continue updating the ticket - adding notes, logging time - until you change it to a resolved status. This allows for post-repair follow-up while maintaining the billing connection.
How do customer email notifications work?
Each customer has a "ticket email notifications" setting on their record. When enabled, they receive an email when a ticket is created for them. To send updates during the repair, choose the Email or Email + SMS note type on the ticket - the message goes straight to the customer and is saved in the ticket history. Email templates can be customized in Admin Settings.
Can I attach files or photos to tickets?
Yes. Use the Attachments card in the ticket detail view to upload photos, documents, PDFs, or any other files - up to 25MB per file and 250MB per ticket. Clicking an image or PDF opens it right in the page (full-screen preview); other types download, and every file also has a download button. Files are stored securely and can only be accessed by logged-in staff. This is excellent for before/after repair photos, documenting device condition at intake, or attaching diagnostic reports.
How do I handle warranty repairs differently?
Create a custom status like "Warranty Repair" and use non-billable time entries. You can also create a worksheet specifically for warranty procedures. Some shops create a "Warranty" issue type to track these separately.
Can multiple technicians work on the same ticket?
Yes. While only one technician can be "assigned" at a time, any technician can add notes and time entries to any ticket. This is common for complex repairs or shift handoffs. Each time entry records who did the work.
How do I track parts that need to be ordered for a repair?
Use the "Need to Order" card on the ticket. Paste the product URL for each part and track its status as Pending, Ordered, or Received, along with an expected arrival date. The parts themselves are billed by adding products to the invoice you create from the ticket.
How can customers on managed devices open tickets themselves?
If the customer's computer has your RMM agent installed, its tray app includes a support request form. When the user submits a request (optionally with a screenshot), a ticket is created automatically under that customer with the device linked, the screenshot attached, and the status set to "Customer Reply" so it appears in your Needs Attention list right away.
Need Help?
Can't find what you're looking for? Our support team is here to help with ticket management and workflow questions.
Contact Support