Ticket Management Settings
Configure how tickets work in your repair shop. Customize statuses, issue types, and worksheets to match your workflow.
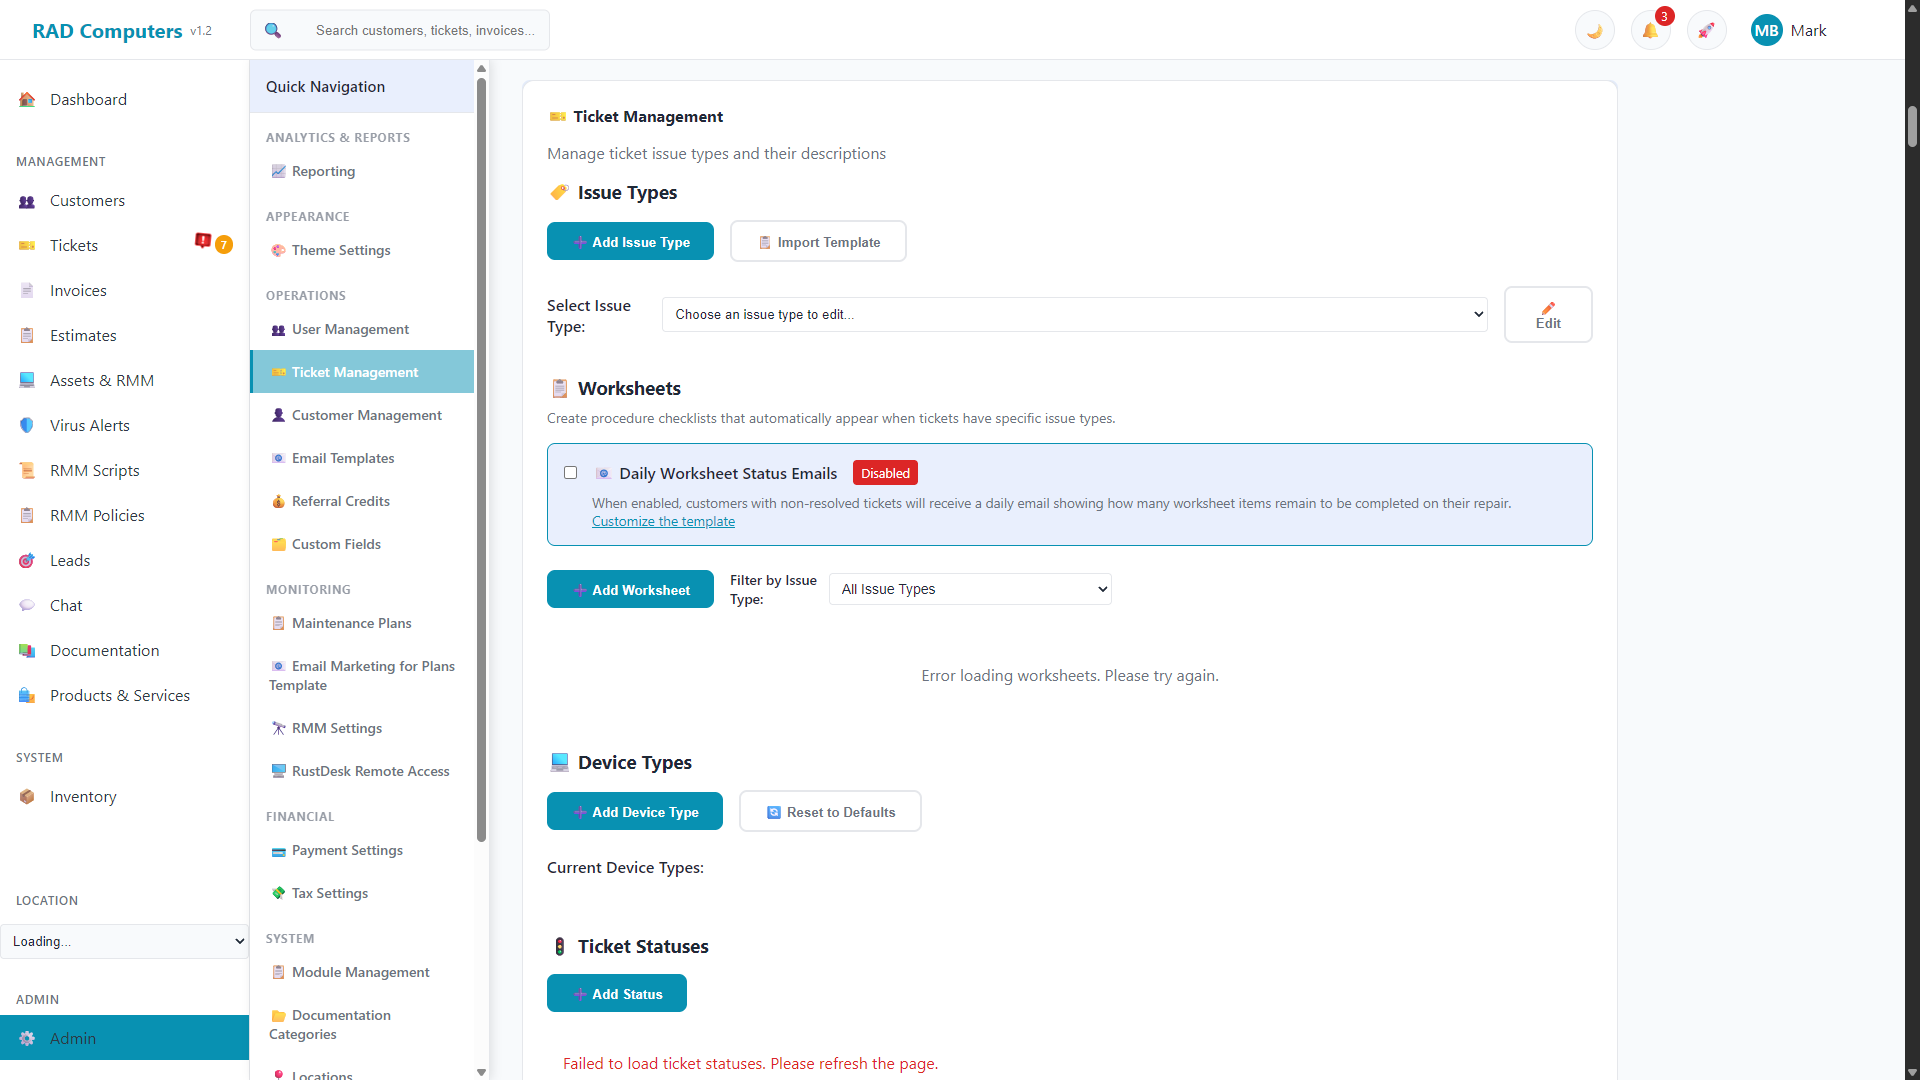
The Ticket Management settings panel for configuring all ticket-related options
Overview
The Ticket Management settings allow you to customize how repair tickets function in your shop. Proper configuration ensures a smooth workflow from device intake to completion.
Key areas you can configure include:
- Custom Ticket Statuses - Define the workflow stages for your repairs
- Issue Types - Categorize common repair problems
- Worksheets/Checklists - Create standardized repair procedures linked to issue types, with optional daily status emails and SMS to customers
- Device Types - The list of device categories available when checking in a repair
Auto-save: Changes in the Ticket Management section save automatically - watch for the "Auto-saved" indicator in the top-right corner of the card.
Custom Ticket Statuses
Ticket statuses define the stages a repair goes through from intake to completion. You can customize statuses to match your shop's specific workflow.
Managing Statuses
Navigate to Admin Settings > Ticket Management to view and manage your ticket statuses in the "Ticket Statuses" section.
Add a New Status
Click the Add Status button. Enter a name, select a color, and optionally set if this status counts as "resolved/completed".
Edit an Existing Status
Click on any status to edit its name, color, or resolved setting. You can also set a status as the default for new tickets. Changes apply immediately.
Delete a Status
Click the delete button to remove a status. You cannot delete a status if tickets are currently using it, or if it is the default status. System statuses cannot be deleted.
Default Statuses
New accounts start with these statuses (all of them except Customer Reply can be renamed, recolored, or deleted):
| Status | Color | Description |
|---|---|---|
| Open | Amber | New ticket, work has not started (the default status) |
| In Progress | Blue | Technician is actively working on repair |
| Waiting for Parts | Purple | Repair paused until parts arrive |
| Waiting for Customer | Red | Awaiting customer approval or information |
| Customer Reply | Indigo | System status - the customer has replied and the ticket needs attention |
| Resolved | Green | Repair finished (marked as a resolved/completed status) |
Tip: Mark statuses as "Resolved/Completed" to exclude them from active ticket counts on the dashboard. Common resolved statuses include "Resolved", "Picked Up" and "Cancelled".
The "Customer Reply" System Status
Customer Reply is a special system-managed status. RAD Repairs automatically moves a ticket to Customer Reply when:
- The customer replies to a ticket email
- The customer replies to the ticket from the customer portal
- A support request comes in from the RMM Monitor tray app on one of their devices
Tickets in Customer Reply are surfaced on the dashboard as tickets needing attention, so replies never slip through the cracks. Because automation depends on it, the Customer Reply status cannot be edited or deleted.
Issue Types Configuration
Issue types categorize the problems customers bring in for repair. They help with reporting and can automatically apply worksheets to tickets.
Managing Issue Types
Common issue types for computer repair shops include:
- Virus/Malware Removal - Infected systems requiring cleanup
- Hardware Repair - Physical component replacement or repair
- Software Issue - Operating system or application problems
- Data Recovery - Recovering files from failed drives
- Screen Replacement - Broken or cracked displays
- Battery Replacement - Worn or failing batteries
- Upgrade - RAM, storage, or component upgrades
- Network/WiFi - Connectivity problems
- Diagnostic - General troubleshooting
- Setup/Configuration - New device setup or configuration
Adding an Issue Type
Create the Issue Type
Click Add Issue Type and enter a display label (e.g., "Slow Performance") and an optional default description that will be pre-filled when this issue type is selected.
Edit or Delete Issue Types
Select an issue type from the dropdown and click Edit to modify it. You can change the label and description, or delete the issue type if it is no longer needed.
Import a Template (Optional)
Click Import Template to add pre-built issue types instead of creating each one from scratch.
Priority Levels
Priority levels help technicians understand the urgency of repairs. RAD Repairs uses four built-in priority levels, numbered 0 (most urgent) to 3 (least urgent).
Available Priority Levels
| Priority | Description | Suggested Use Case |
|---|---|---|
| 0 - Urgent | Highest priority | Critical issues, rush jobs, emergencies |
| 1 - High | Elevated priority | Important repairs, business customers |
| 2 - Normal | Normal priority (default) | Standard repair work |
| 3 - Low | Lowest priority | Non-urgent repairs, upgrades, maintenance |
Note: Priority levels are built-in and cannot be customized. You select a priority when creating a ticket, and can also set an optional "Due By" date and time.
Device Types
Device types are the categories offered when checking in a device on a new ticket (for example Desktop, Laptop, Tablet, or Phone). In the Device Types section you can:
- Click Add Device Type to add a new category
- Remove device types you don't use
- Click Reset to Defaults to restore the standard list
Worksheets and Checklists
Worksheets are procedure checklists that automatically appear when tickets have specific issue types. They help ensure consistency and serve as documentation of work performed.
Creating a Worksheet
Name Your Worksheet
Click Add Worksheet and give it a descriptive name like "Virus Removal Checklist" or "Laptop Diagnostic Form".
Link to Issue Types
Select one or more issue types that this worksheet should apply to. When a ticket has any of these issue types, the worksheet will automatically appear on the ticket.
Add Checklist Items
Add the items technicians need to complete. Each item can be marked as completed as the technician works through the repair.
Set Sort Order and Status
Optionally set a sort order (lower numbers appear first) and mark worksheets as active or inactive. Inactive worksheets will not be attached to new tickets.
Daily Worksheet Status Emails and SMS
You can keep customers informed about their repair progress automatically:
- Daily Worksheet Status Emails - When enabled, customers with non-resolved tickets receive a daily email showing how many worksheet items remain to be completed on their repair. The email template can be customized in Email Templates.
- Daily Worksheet Status SMS - When enabled, customers with SMS enabled receive a daily text message showing worksheet progress. This requires Twilio to be configured in the App Center.
Send times are configured per location in the Location settings (each location has a timezone and a Notification Send Time).
Example: Virus Removal Checklist
Sample Worksheet Items:
- Backup important data before proceeding
- Boot into Safe Mode
- Run Malwarebytes full scan
- Run Windows Defender offline scan
- Check browser extensions and remove suspicious ones
- Clear browser cache and cookies
- Review startup programs in Task Manager
- Check hosts file for malicious entries
- Update Windows and all software
- Install/update antivirus software
Note Defaults
Choose which note type the ticket page's note editor starts on: Public Note, Private Note, Email, SMS, or Email + SMS. Shops that mostly write internal technician notes can default to Private so nothing accidentally goes out to the customer; shops that message customers on every update can default to Email or Email + SMS. Technicians can still switch the type on any individual note.
Editing and Deleting Notes
Staff with the right permissions see ✏️ edit and 🗑️ delete buttons on ticket notes. The permissions are granted per role in User Management (Ticket Management → Edit Ticket Notes / Delete Ticket Notes); owners and admins always have them.
- Public and private notes can be edited and deleted. Edited notes show an (edited) marker.
- Sent communications (Email / SMS notes) can be deleted but never edited — the ticket must not misrepresent what the customer actually received. Deleting one leaves a system note recording who removed it.
- Customer messages and system entries (inbound emails/texts, portal replies, automated notes) are a permanent record and can't be changed or removed.
Resolved Ticket Follow-Up Email
Automatically thank customers and ask "how did we do?" after their repair is finished. When enabled, customers receive a follow-up email a configurable number of days (1-60, default 3) after their ticket is marked resolved.
Enable the Follow-Up
In Admin Settings, find the Resolved Ticket Follow-Up card (below the Worksheets section) and turn on Follow-Up Email After Resolution.
Choose the Delay
Set how many days after resolution the email is sent. A few days gives the customer time to actually use their repaired device before you ask how it went.
Customize the Message (Optional)
The email uses the Ticket Follow-Up template in Email Templates. The default is a thank-you / "how did we do?" message with a button to the customer portal, where the customer can view their service history, pay invoices, and sign up for a maintenance plan.
How it works:
- Each ticket receives the follow-up once. If a ticket is reopened and later re-resolved, a fresh follow-up window starts.
- Cancelled tickets and tickets merged into another ticket are never followed up.
- The portal button is a secure sign-in link (same as Send Portal Link on the customer record).
- A system note is added to the ticket when the follow-up is sent, and the email appears in the ticket's email history.
- When you first enable the feature, only recently resolved tickets are picked up - it won't email customers whose tickets were resolved weeks or months ago.
- Skip customers with an active contract - tick this option to exclude managed clients (customers with an active contract on their Contracts tab) from the retail "how did we do?" email.
- SMS follow-up (optional) - the follow-up can also send a text: enable the SMS Variant on the Ticket Follow-Up template in Email Templates (off by default; requires SMS to be configured).
Default Status
You can set one status as the default for newly created tickets. When editing a status, check the "Set as default status for new tickets" option to make it the default.
Tip: Most shops set "Open" or "New" as the default status so new tickets are immediately visible in the active ticket list.
Frequently Asked Questions
Can I delete a ticket status that has tickets assigned to it?
No, you must first reassign all tickets to a different status before you can delete a status. This ensures no tickets are left in an undefined state.
Can I delete the default status?
No, you must first set another status as the default before you can delete it. There must always be one default status for new tickets.
What are system statuses?
System statuses are special statuses managed by RAD Repairs - currently "Customer Reply", which is set automatically when a customer replies by email or portal, or sends a support request from the RMM tray app. System statuses cannot be edited or deleted because automated functionality depends on them.
How do worksheets get attached to tickets?
Worksheets are automatically attached to tickets based on the issue type. When you link a worksheet to one or more issue types, any ticket with those issue types will have the worksheet available.
What happens if I mark a worksheet as inactive?
Inactive worksheets will not be attached to new tickets. Existing tickets that already have the worksheet attached will keep it, but no new tickets will receive the inactive worksheet.
Can I filter worksheets by issue type?
Yes, use the "Filter by Issue Type" dropdown above the worksheets list to show only worksheets linked to a specific issue type.
Need Help Configuring Ticket Settings?
Our support team can help you set up ticket statuses, issue types, and worksheets tailored to your shop's workflow.
Contact Support